Let This Be A Lesson To All Of You!
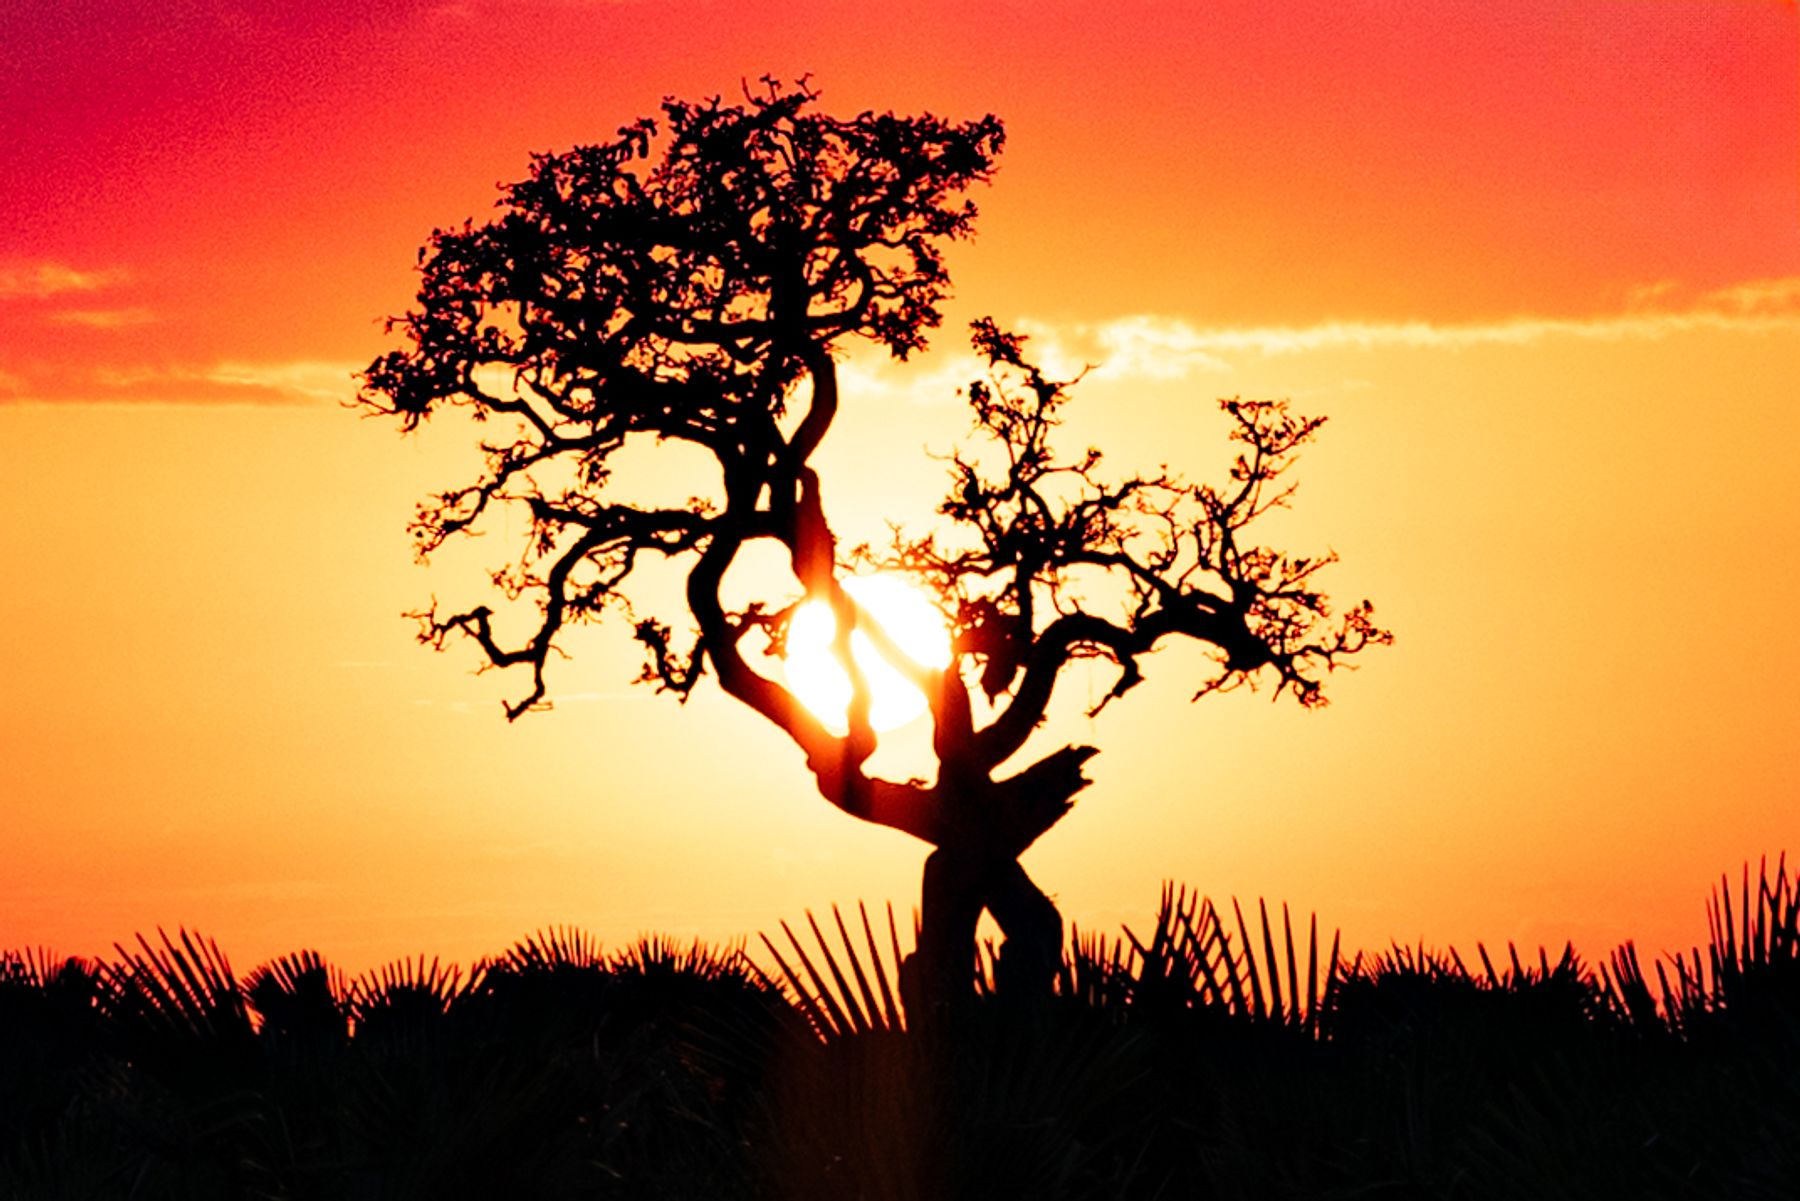
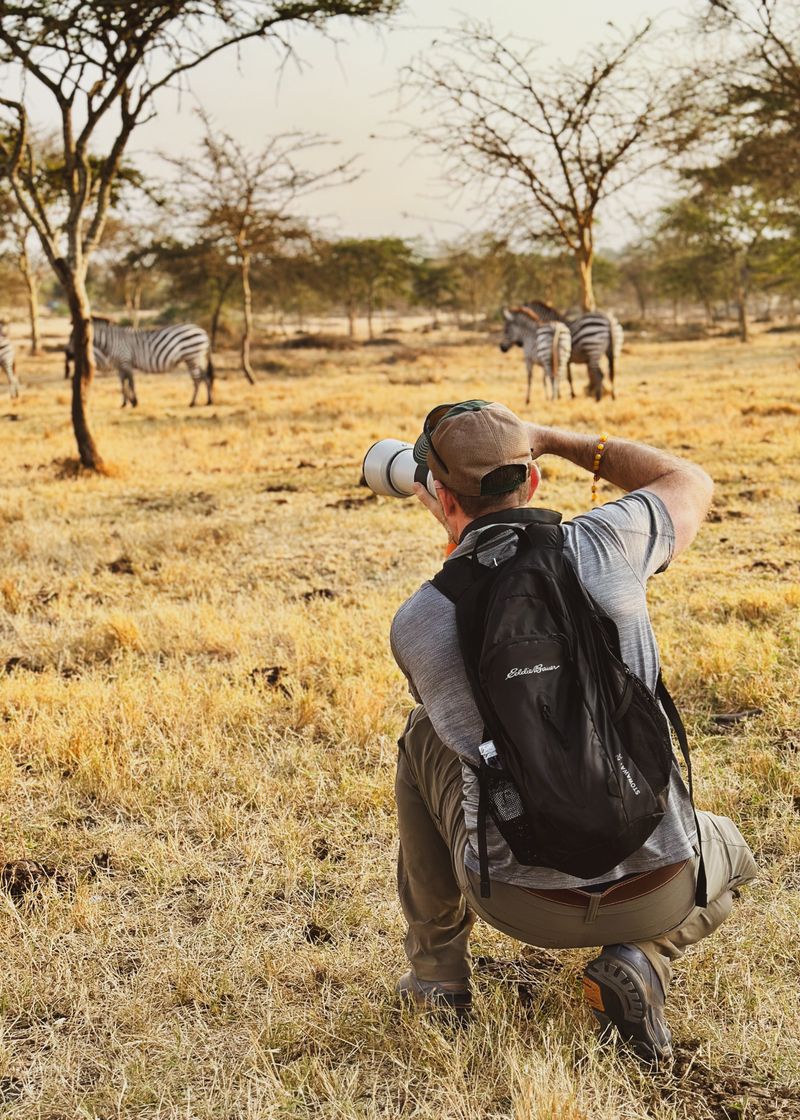
Murchison Falls National Park, Uganda
The lesson is possibly, "Be careful what you wish for," but yes, Behold, I am going to attempt to teach you all some... stuff. Photography Stuff.
This is rare for me, but I shall actually attempt to get (somewhat) technical here for bit. Yep, this is officially a Nerdy Technical Photography Article. This is happening, folks!
Why? Why is this happening? Well, honestly, because I think I know a better way to explain some things, things that could probably be helpful to other photographers. It’s the way I wish these things were explained to me...but weren’t.
********************

WHAT ARE YOU MESSING WITH?
It’s taken me many years to realize this, but I’d dare say that the primary difference between shooting in a studio and shooting out in nature can be simplified like this:
In the field, if your light is the sun, then chances are, you don’t have very much control over it; therefore, to control your image, you are messing with the camera settings, and you are messing with them CONSTANTLY.
Not the case with most studio shoots. In the studio, you often choose all your camera settings first— usually long before any shooting ever begins— then you basically LEAVE THEM ALONE. You mess mostly with the LIGHTS. You stop the lights up and down; not your camera.
This is reductive, I know, but if someone would have explained this to me, it would have saved me a lot of headaches. Trying to transition from working with natural light to studio lights, I wish someone would have explained the m.o. to me in very simple terms. I wish they would have said, “Stop messing with the camera settings so much—like you’re used to doing outside— to try and control your light! You’re in a studio, mess with the LIGHTS to control your light!”
I’d go so far as to stay that studio photography and natural light photography are two completely different art forms with two very unique skill sets. The camera tricks you’d use outside, when the light is out of your control, all seem clumsy and unnecessary inside a studio, and likewise, all the tricks a studio photographer uses are completely obsolete once you plop him outside and take away his electricity and lights.

Studio vs Natural Light Photography
In the studio, before you ever start shooting, you usually predetermine the desired camera settings you are going to shoot with. Which settings do you think are ideal to achieve the aesthetic outcome you desire? This includes things like your ISO, your shutter speed, and your f-stop. Then, you position and attenuate the LIGHTS to achieve the nuanced artistic affects you want. The camera settings more or less stay the same throughout the shoot, save for small tweaks. Your focus in the moment is really on the lights, as well as on your subject.
But with natural light photography, especially when shooting wildlife, journalism, or landscapes, the light is often out of your control. Your light is the sun, and the sun is constantly changing. Therefore, it is the CAMERA SETTINGS you are continuously adjusting and rethinking, along with where to position the camera. You’re not thinking about how to change or reposition the light, you have very little control over that. And even the two things you do have control over— your camera’s position and your camera’s settings— you probably won’t be able to determine with any real precision until the day, hour, or second it’s time to shoot.
Any good natural light photographer knows what settings he’d ideally like to use, sure; but then a cloud moves in front of the sun, or an animal runs over and hides under the deep shade of a tree, and suddenly all bets are off. You need a new plan. You must adapt. In a sense, you are no longer in charge, the sun is. Or in some cases, the animal. Or the wind. Or… more factors than I could ever list.
Camera Settings and Gadgetry
There are many features on modern cameras that might seem like unnecessary bells and whistles, and I used to truly think that way, too! Until one fateful day, the conditions are such that you look around and find yourself suddenly needing that very bell or that exact whistle! You think, “Oh! That's what this button is for!” or “Now I see why they included this setting…!”
Many of the more esoteric features on fancy cameras are designed to assist you when the subject (or the conditions surrounding your subject) are out of your control and are moving or changing faster than you can realistically keep up with.
In fact, even the most commonly used gadgetry, the stuff we take for granted (like autofocus) is intended to free up one of your hands (or in some cases, also a portion of your brain) so it can operate (or think about) another piece of the puzzle. The gadgets are there to make things easier for you, should you need them.
Now, having said all that, I’ll tell you one of the side benefits that comes not only with knowing what all the features on your camera are for, but also just with experience— it’s knowing which features you don't need, and therefore don’t need to pay for when buying a camera, lenses, or gear.
In my case, it’s video. For years, I convinced myself that I needed certain video features on my still camera, should the situation arise where I suddenly needed to shoot motion pictures. Well, it’s been almost 20 years, and that situation has never come up. If I’m shooting video, then I have a different camera and setup for that altogether.
The idea that I’d be out on a still photoshoot and suddenly have the need to shoot video— but HANDHELD, and with no synced audio?— that’s wildly unrealistic. What are you going to do with footage like that? For me, the answer is nothing. No one likes to take a possibility off the table, and yet, I’m at a point where I can be honest with myself. Usually, on any given project, I’m shooting either stills OR video, exclusively, not simultaneously, and knowing this about myself allows me to spend my money more wisely and efficiently.
Therefore, if a camera body appears to be primarily focused on (and undoubtedly more expensive because of) all the improvements, bells, and whistles that it offers in the realm of videography, I have learned to all but ignore those features. I’d be concerning myself with (and probably paying for) a whole bunch of stuff I have never, and likely will never, use. And if I’m never going to use it, I can’t let it inform or persuade my purchasing decisions.
When in the market for a new camera body, I always have to remind myself, “Don’t forget, Ryan, you aren’t buying the best camera for hypothetical situations and a hypothetical photographer, you’re buying it for yourself, and the very real circumstances in which you shoot.”
What do you need your camera to do? What don’t you need it to do?
Then, of course, in the back of my head, there’s always that little voice that says, “And what about the stuff you might need it to do, but just don’t know it yet?!”
Ugh. The dreaded unknown! But luckily, the longer you do this, that list of hypothetical situations you’ve yet to encounter gradually becomes smaller and smaller. Plus, you’ll have a whole list of things you know FOR SURE you need your camera to do, or things you wish that it did better.
Yeah. Focus on those.
It took me many years to learn this, but when buying camera gear, don’t listen to what a piece of equipment can do and then imagine hypothetical situations where you might possibly use that equipment— your brain will always be capable of inventing such scenarios. Instead, imagine yourself shooting, and the very real problems and frustrations you encounter on a daily basis, and then buy the gear that will help you to actively solve those problems.
Not realizing this sooner is the reason I have a bunch of fancy, expensive studio lights, that I could hypothetically accomplish a lot of cool stuff with, but which, in reality, serve the primary function of living in my office closet and taking up space.
Autofocus and Back-Button Focus
Can you imagine what it must have been like for wildlife photographers before autofocus? If an animal was charging at you or running unpredictably at top speed across a field, every ounce of your energy would be concentrated not just following that animal, but on keeping that thing in focus! You’d have no time to think about almost anything else!
Autofocus is a game changer, and yet, there are so many instances when the absolute best thing you can do as a photographer is to turn it off. Or at least, have a plan of how to quickly override it… to trick it. To dominate it!
Enter back button focus.
I think a lot more people would use this feature, and set up their cameras this way, if only they knew exactly what problem it solved. And if you are a wildlife photographer, you’ll especially want to set up your camera this way, because trust me, it’s a game changer: It solves the age-old problem of the wrong thing accidentally being in focus.
I have gotten so used to using back-button focus, that I rarely ever take my camera off this setting; but then again, I seldom shoot in a studio.

FOCUS IN THE STUDIO:
A note: I sometimes use the word “studio” or “studio setup” to refer to any scenario where I have complete control over everything. Even if I’m outside, and even if I’m using natural light, if I have complete control over every aspect of my shot, then that’s a studio setup to me. Take the berries above, for example.
I’m shooting outside, but my natural light is also being augmented by a powerful daylight-rated strobe. There’s two reasons I am able to do this here (but little where else):
1. Unlike animals, baskets of berries don’t move, they aren’t unpredictable.
2. Unlike most of the landscapes I shoot (both natural and residential), I do not require a wide, sweeping shot where huge lights would either be in my shot, or be too far away to make much of a difference.
In scenarios like these, there’s no reason for your focus not to be exactly where you want it to be. You have all the time in the world—your strawberries aren’t going anywhere— and in fact, in rare situations like this, I like to take the opportunity to play around with my focus. Do I like it better on the strawberries in the back, or shifted slightly to the blackberries in the foreground?

If this is the kind of photography you usually do, then my revelation about back button focusing probably isn’t going to be life-altering for you. From pulling focus manually to pressing the focus button halfway and then recomposing your shot, there are a lot of options available to someone who is shooting still subjects in controlled environments.
Or, if it’s headshots and human portraits you’re shooting, there is rarely a time when you wouldn’t want the eyes of your subject to be in focus. In which case, there are many other tricks at your disposal, such as the advanced eye-tracking features offered by most pro-grade cameras.
FOCUS IN THE FIELD:
But what if you are shooting a fast-moving, unpredictable subject, like an animal… and you’re shooting outside in lighting conditions that are constantly changing… and the wind (or the animal itself) keeps moving or rustling foreground elements such as foliage, so that your camera (or you!) can’t keep up? The focus keeps shifting to the wrong thing!
Let me throw in one more variable, since many wildlife photographers are often using very long lenses. Let’s say you are on a 500mm lens; a lens like this isn’t likely to be very fast, so by necessity, your aperture is wide open or darn close to it, and therefore your depth of field is extremely shallow. This means that if your focus is off by just a hair, it will be devastatingly noticeable.
If all this sounds like a hypothetical contrivance of an academic nature, well… surprise! It’s not, it’s real. Allow me to introduce the last time I shot without using back button focus:
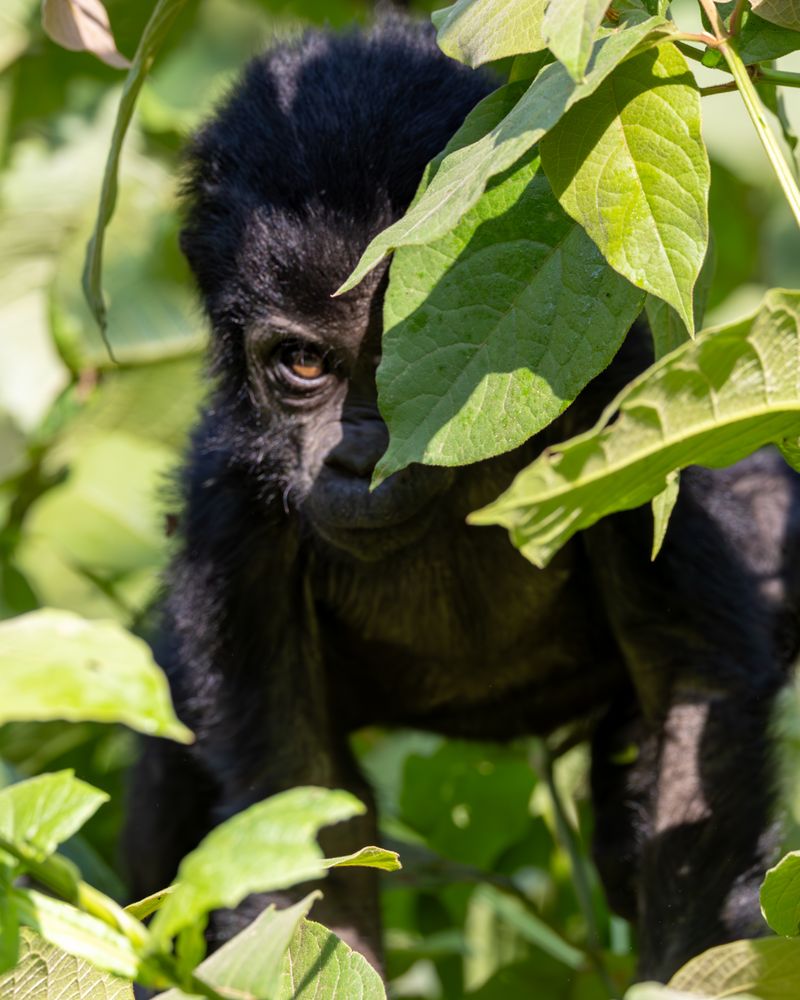
I couldn’t get my camera to stop focusing on the moving foreground leaf, or pull manual focus in time, before the situation changed and I lost the shot forever.
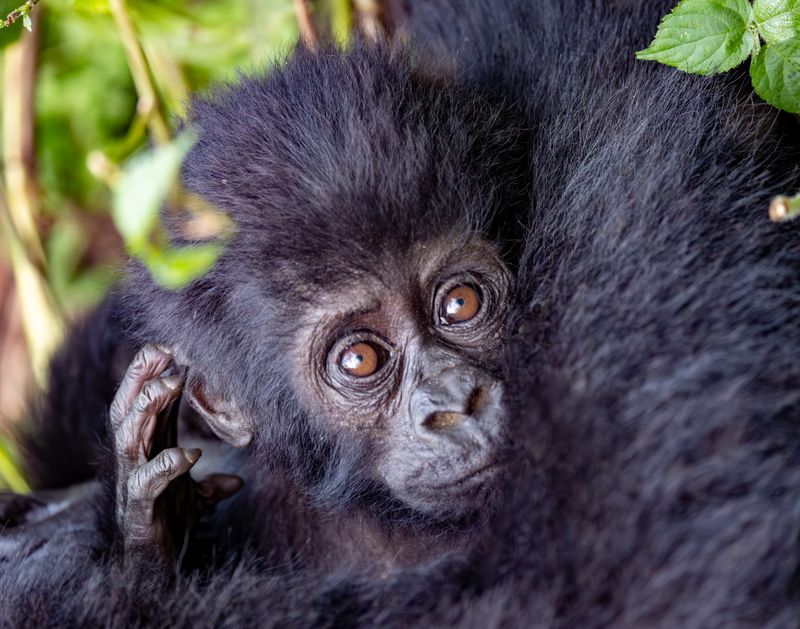
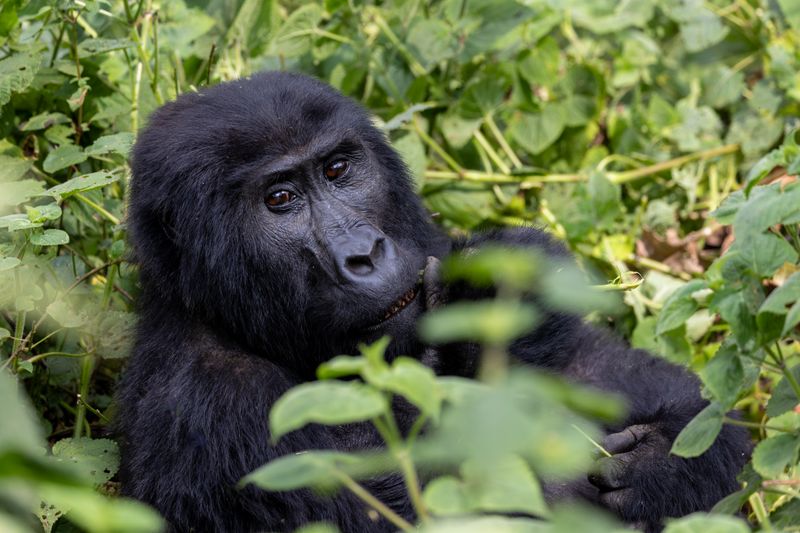
And when I say my focus is off by a hair, here I mean that quite literally! The focus is on the leaf, rather than the baby gorilla’s eye or hair, where I would have preferred it to be; but I was unable to achieve that in time, because he moved.
But never again, I say!
I have used back button focus ever since this missed shot, and I’ve never looked back.
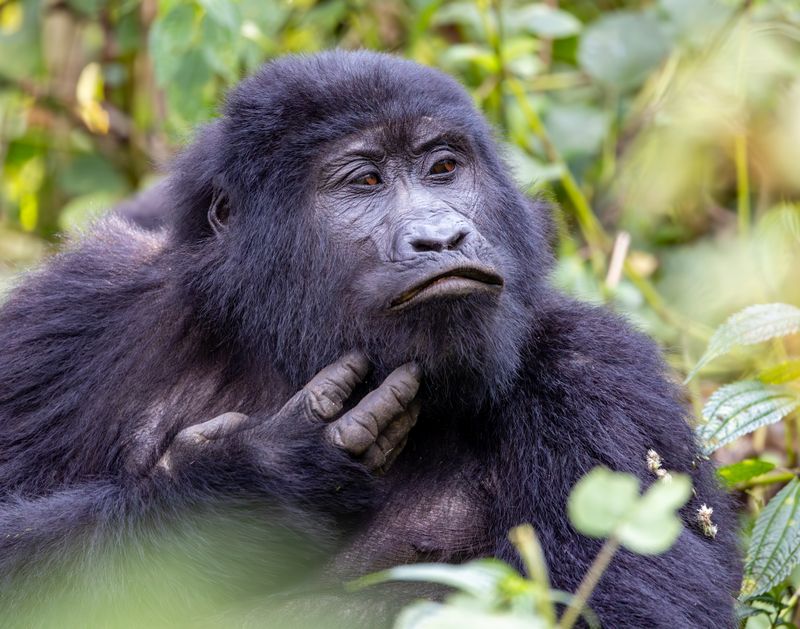
Allow me to show you other times when back button focused has saved my ass. In each of these photos, there was a moving foreground element that would have caused an autofocus setup to constantly search for (or ultimately shift) the focus off the intended subject. And pulling focus manually would have been near impossible for me. (I’m not saying it couldn’t be done, I’m saying I personally couldn’t have done it, Lol!)
A 500mm lens is heavy and awkward and the gorillas were moving unpredictably over uneven territory, thereby forcing me to move with them on the fly. Not to mention, if I switched to manual focus, I would have lost all the perks of my camera’s animal-eye tracking ability. Therefore, trying to pull manual focus in this scenario would have been pure machismo, and the kind of unnecessary bravado that would have likely left me with one decent photo out of every 20. If that.
Instead, using a combination of animal eye tracking and back button focus (as well a special backup plan I discuss in the next section, that I configured for when the eye tracker goes AWOL), I was able to achieve a seemingly endless series of shots, all with the focus perfectly on the eyes.
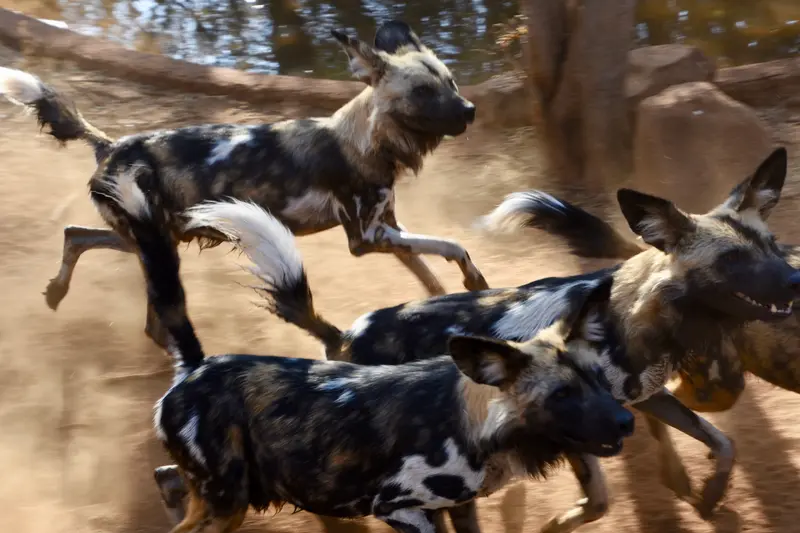
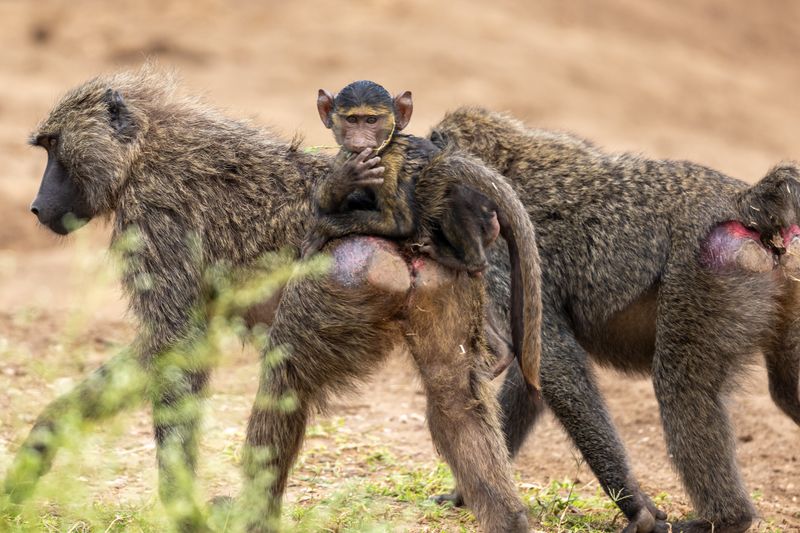
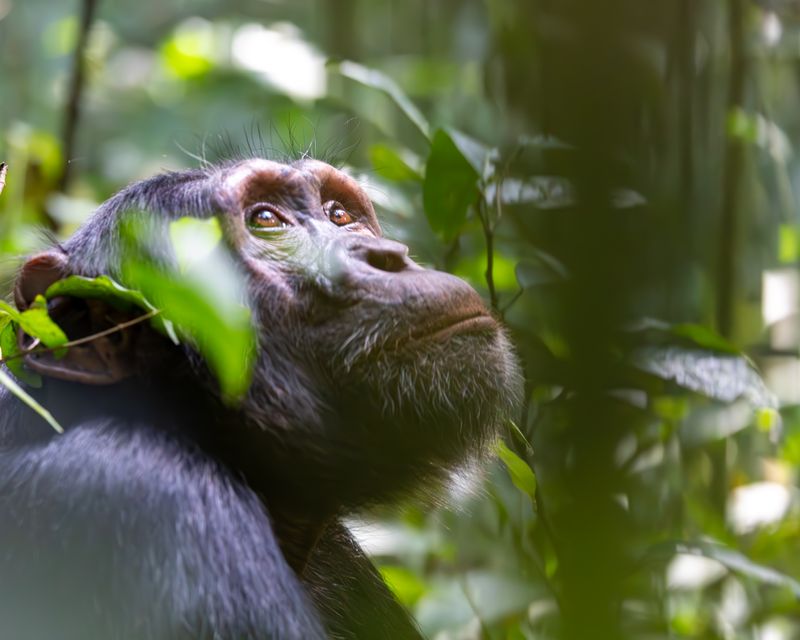
Here are some other scenarios where constantly moving foliage in the foreground would have undoubtedly shifted focus to the leaves and off of the animals— as was invariably the case with many of the other photographers who were not yet using back button focus. (But believe me, I bet you they are now!!)
ANIMAL EYE TRACKING
When shooting unpredictable or fast-moving animals, I have consistently found my Canon’s animal eye tracking feature to be more helpful than not. However, it is not without its shortcomings, so I will share with you my exact camera setup— what I’ve done to safeguard myself in the eventuality that the eye tracking feature becomes confused.
And if you shoot in animal eye tracking mode enough, trust me, eventually you will encounter times when it becomes confused. It’s inevitable. Eye tracking is just a combination of sensors and algorithms, after all, and so sometimes it will mistakenly get fixated on something that it THINKS is an eye, but which is definitely not an eye. In such situations, you may find that it becomes frustratingly difficult, or almost impossible, to get it back on track.
For me, it seems to always be ears. This has happened with several different animals over the span of several years, but none more so egregiously than with rhinos.
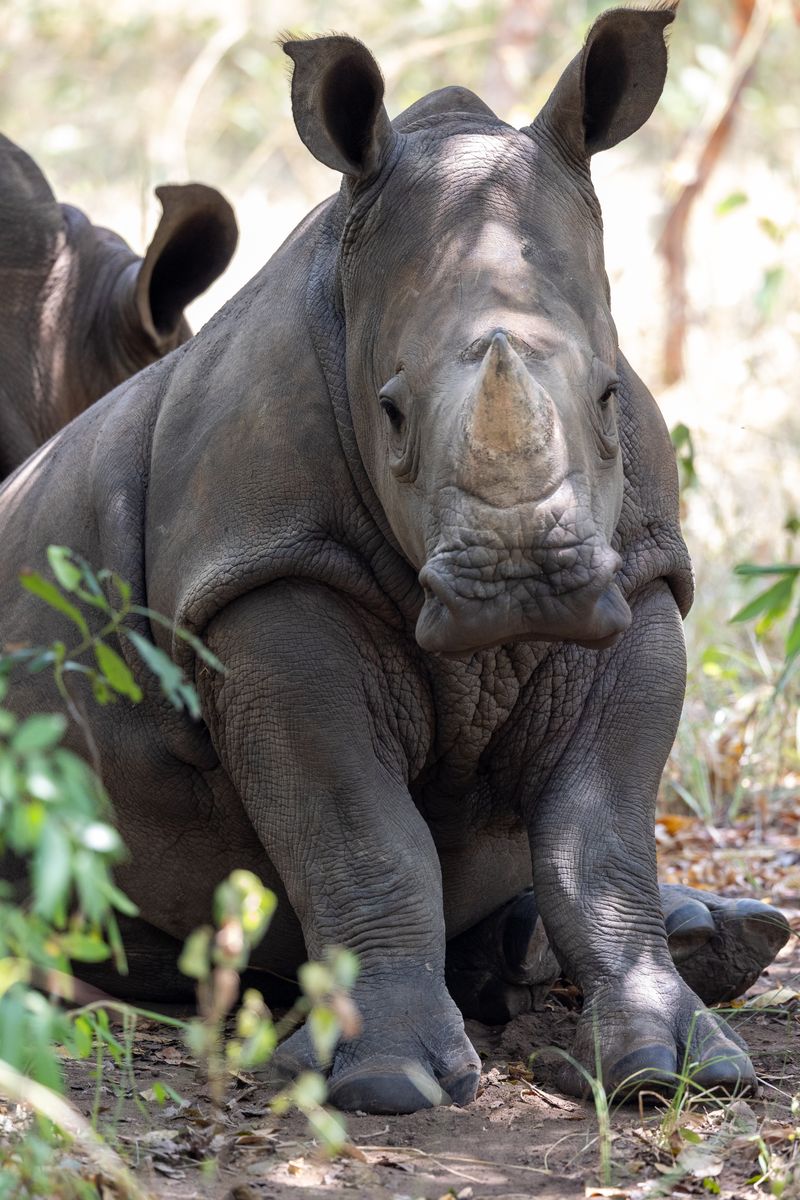
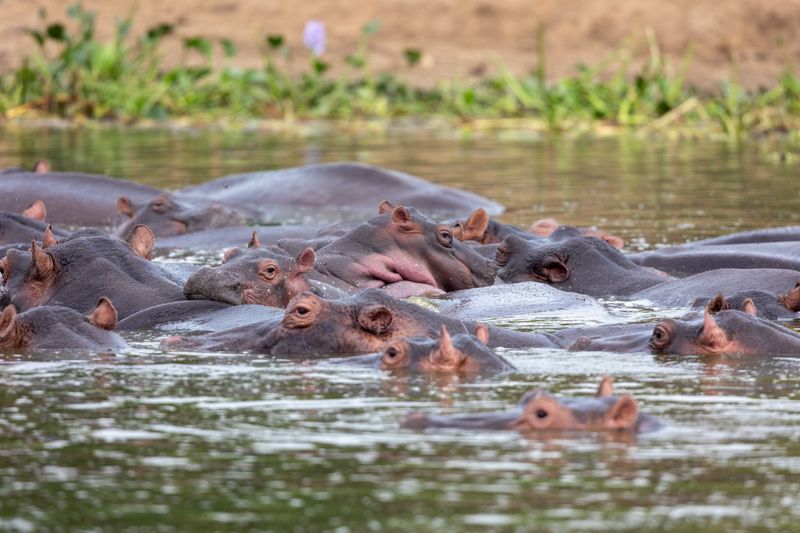
My camera was convinced that the almond-shaped shadows of the rhinoceros’ and hippos' ears were actually eyes, and it was impossible to get the camera to see otherwise. It became fixated, firmly locked on to their eye-shaped ears, and unless I had a way to quickly override my camera, I was going to lose the shots. I was going to end up with a lot of photographs where the animals’ EARS— not their EYES— were in sharp focus.
But no worries, I had a backup plan for just this eventuality. I set up TWO back button focus options. To my main back focus button, I assigned my animal eye-tracking focus. But if I move my thumb over just slightly to the right, I have another button assigned to pull spot focus.
That way, if my camera becomes confused, I can quickly override it and focus on what I know to be the animal’s actual eye. I just hastily put what I want to focus on in the center of my camera (or within the bounding box of my spot focus meter, wherever in the frame that might be), and then I’m back on track. Barely missed a beat. I’m once again properly focused on the animal’s eye, instead of absurdly focused on an almond-shaped ear hole.
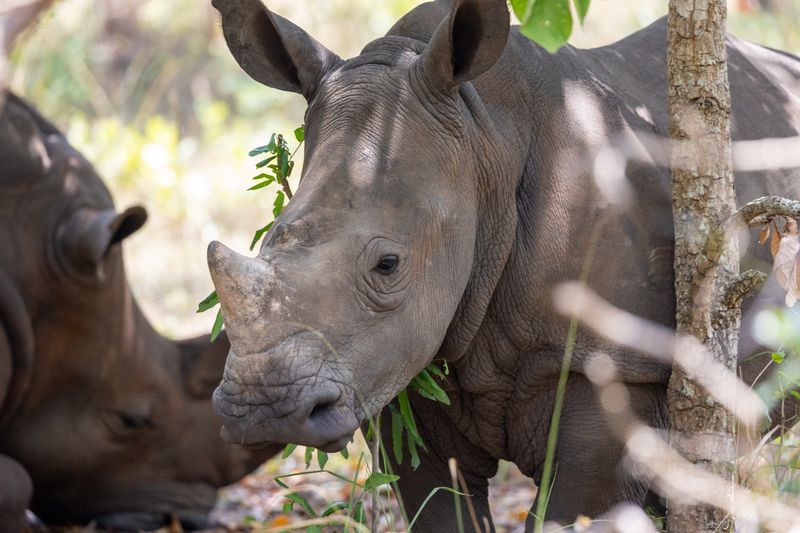
You’d be surprised how often the Canon does this with ear holes. Seriously.
Also, with this dual back button focus set up, I do not have to switch out of whatever mode I’m in should, say, I decide on the fly I want to stop focusing on animal’s eyes and instead compose a nice wide landscape shot where the animals are not the primary focus. Or, where no eye is present at all, and I need my camera to stop hunting for one. No mode switching required, I just move my thumb over and use the neighboring button that’s assigned to pull “regular” (I.e., not eye-tracking) focus.
MANUAL MODE, BUT WITH AUTO ISO
One last thing I want to cover is the advent of being able to shoot entirely in manual mode, but with the exception of allowing your camera to choose the ISO for you. Assuming you know what ISO is and understand how it affects the grain and quality of you image, your next question might very well be, “And why would I want to do this?”
Well, you wouldn’t always. And you certainly wouldn’t want to do it in the studio situations we talked about earlier, where time is on your side and you have the ability to control almost every aspect of your shoot.
However, in fast-moving situations that are constantly changing and out of your control, here’s what shooting in Manual with Auto ISO essentially allows you to do: you get to maintain control over all the creative choices that are important to you and that will affect the overall aesthetics of your image— like how fast you freeze your subjects’ motion and how much bokeh you achieve in your backgrounds and foregrounds— but then you let the camera pick up the slack, and do the rest of the math for you, to make sure you come out on top with a properly exposed image.
A high ISO is no longer the death sentence it once was, especially now that you can reclaim a lot of that grain integrity in post (check out Lightroom’s new Denoise feature), and especially since most cameras allow you to set a maximum ISO limit, to make sure your camera doesn’t push the ISO beyond what you deem acceptable. So, although you are indeed giving up a bit of control, from where I stand, it doesn’t seem like you are giving up very much if it, and you aren’t giving it up where it matters most.
Don’t let an inflated ego or an old school notion of acceptable ISOs keep you from getting the best photo possible. Besides. How bruised will your ego be when an amateur photographer, shooting on an iPhone12, has better pictures than you do, all because you insisted on doing everything manually?
Auto ISO is no different than all the other features on a camera, all the other “bells and whistles,” insomuch as half the battle is knowing what feature to use, and when to use it.
And I’ve found that when wild animals, such as gorillas and chimpanzees, are running through a jungle and you’re running after them, with your heavy camera around your neck and your enormous 500mm lens fully extended, and both you and them are constantly running in and out of light and shade and you’re tripping over roots and being hit in the face with leaves and palm fronds (and holy shit! does the silverback seem to be getting upset?! Crap!) and your camera keeps trying to focus on their stupid monkey ears rather than their monkey eyes, and now you’re so close to them that you’d really like to change lenses but there’s no time for all that, plus, your hands are super filthy anyways from when you fell earlier in the mud and….. yeah.
Show me that auto ISO!
I’ll take all the help I can get!
Maybe next month I can get another gig where I just shoot more strawberries.
*******************
Read more about photographing gorillas and other primates in the wild HERE.
Or how about we go and shoot ourselves some lions HERE?!!
Or, for a nice and well-rounded safari out on the African savanna -- try THIS out.